Earlier in the year we went through a bathroom remodel, which had many budget-conscious decisions along the way. I’m excited to tell you about our renovation experience and share these bathroom remodel before and after photos with you!
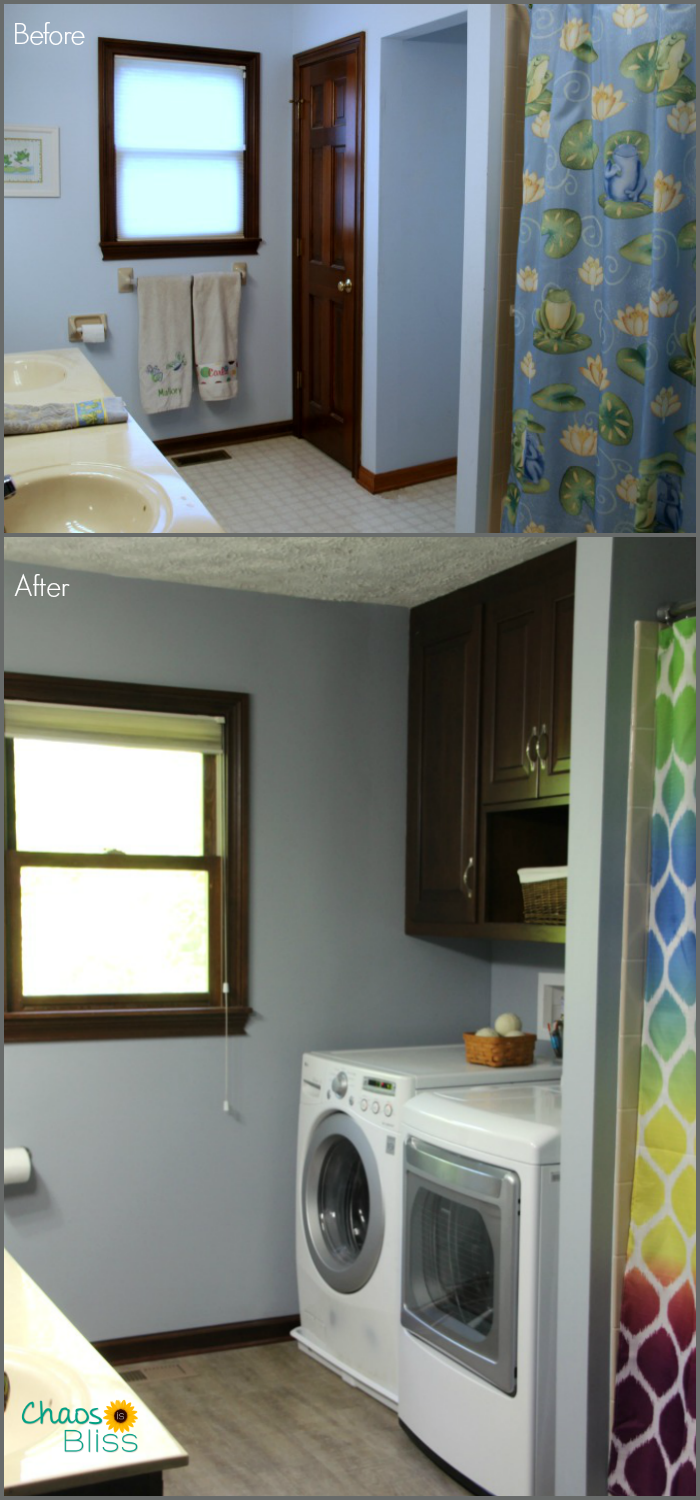
Upstairs Laundry Room: Before
When we first moved to our house, a nice bonus feature was an upstairs laundry that was in our kids’ bathroom. The washer and dryer were stacked, next to a linen closet. I felt absolutely spoiled to have an upstairs laundry, for sure.
… Right up until our washer broke and we had to replace it. Fun fact: if you want to keep a stackable washer/dryer unit, you have to replace both. We opted not to, because the dryer worked just fine and we couldn’t justify spending hundreds of dollars unnecessarily to replace a perfectly working appliance.
So, back downstairs to our cramped, awkward little mudroom the old dryer went, and a new washer was purchased.
This left a new issue of a huge gaping space in the upstairs bathroom where the original stacked washer/dryer were. For about a year it housed a guinea pig habitat, and the rest of the time it just sat empty.
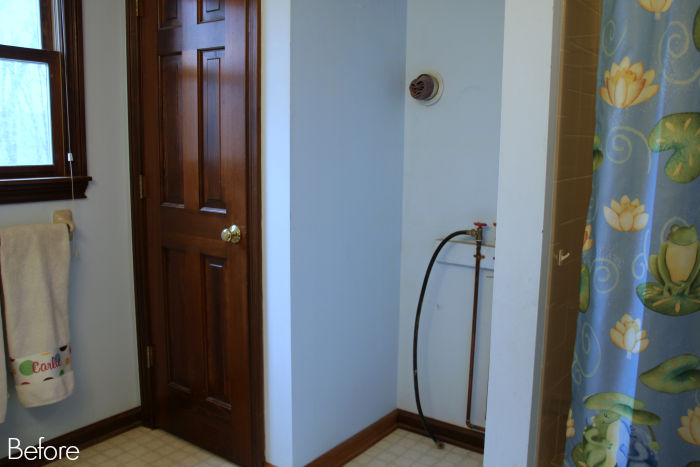
Downstairs Laundry Room: Before
I hated this space right off the garage, where our washer and dryer needed to go back to (when the house was built, this is where the original laundry area was).
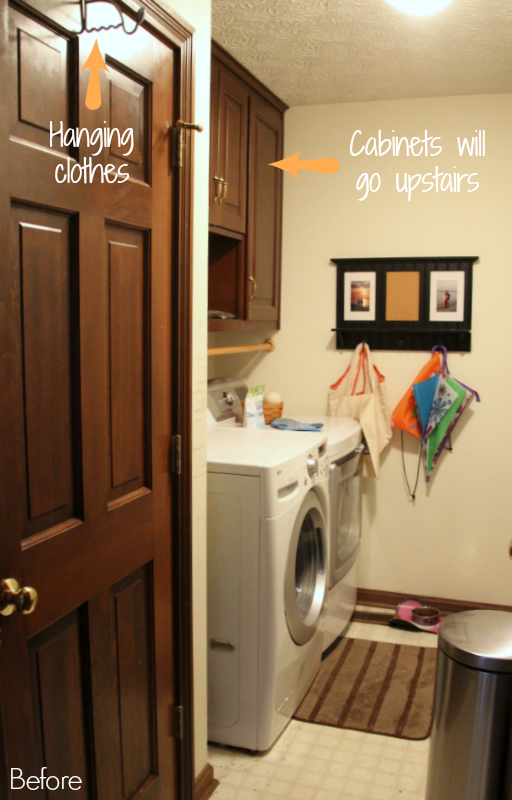
I really, really hated doing my laundry in the mudroom. The new washer is a front loader, and no matter how careful I am, freshly washed, wet laundry falls onto the floor as I try to get it into the dryer, picking up all sorts of yummy dust bunnies and dirt tracked in from the garage. Lovely.
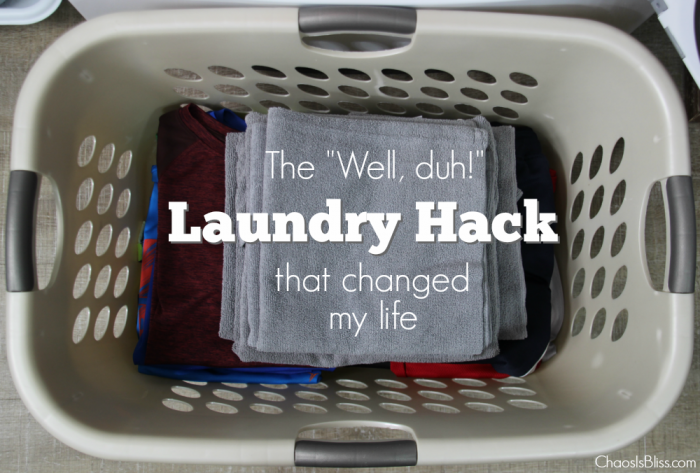
There was no place to fold clothes, so I adopted this laundry hack which has been a lifesaver. There really wasn’t a great space for hanging clothes either, except for a small over-the-door hook that I could shove maybe 10 hangers onto.
Then I had an idea. And I measured. And it would work.
Bathroom Remodel Plan
One day I was cleaning my kids’ bathroom and I turned around and just looked at the space. A good-sized linen closet, and a big empty space next to it.
What if …
- What if we open up the space by demolishing the wall between the closet and where the original stacked washer & dryer were.
- Then, what if we bring the washer & dryer back upstairs, side by side.
- And because cabinets are the most expensive thing in a remodel, what if we saved on that expense and instead bring the original cabinets upstairs, so they would remain above the washer and dryer in the new space.
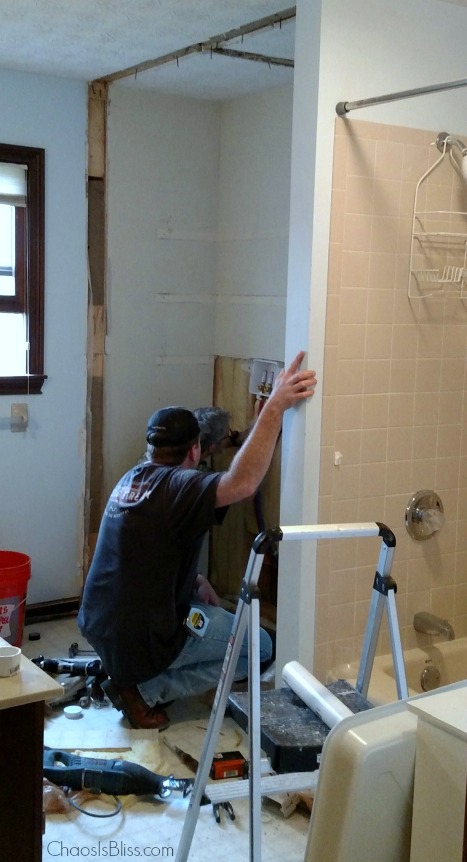
It was brilliant! Since the thought of a sledgehammer and pipes scares the heck out of me, we hired a contractor to do the work.
One direction I gave to our contractor that made him scratch his head a bit, was that I wanted the cabinets to be offset to the left instead of centered.
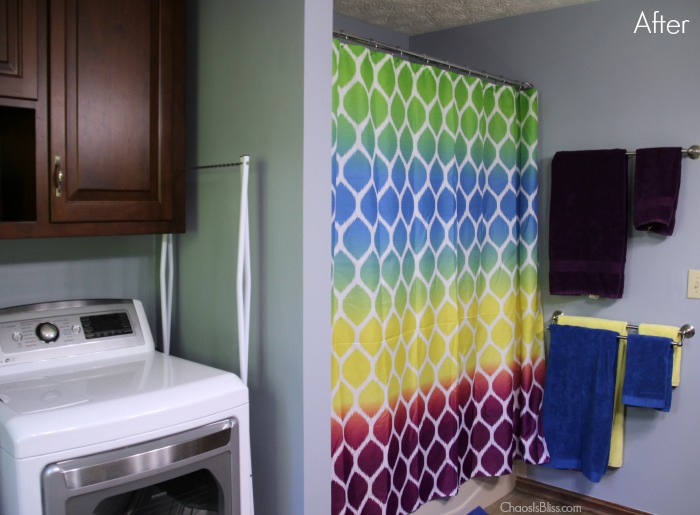
Why? Because in losing the closet, I also lost the space for a hanging clothes rack. Offsetting the cabinets gave me just enough inches that this clothes rack can fold up and tuck away when not in use. It was brilliant, but I’m sure when we sell the house it might make potential buyers scratch their heads as well! (See in the next photo below).
Kids’ Bathroom Makeover
When we first moved to our house, Mallory was 4, Dylan 2 1/2, and I was 7 months pregnant with Carlie. So we kept the same cute froggy themed shower curtain, framed art and matchy-machy toothbrush holder which looked great for a little kids’ bathroom.
Now that the kids are 12, 10 and almost 8, we were all ready for an updated look to more of a tween bathroom – something for either gender, and definitely more modern.
Let me tell you – it’s really hard finding a shower curtain for older kids, unless it’s attached to a particular theme. I found this shower curtain and decided it was neutral enough, with fun, bright colors and it should be easy to find towels that match. The bonus is that I could have a different, designated color for each child so they don’t accidentally use their sibling’s.
As with many bathroom remodels – or any home renovation, perhaps – once you’re in the middle of it, you’re inspired to add more fun to the project!
3 Inexpensive Bathroom Remodel Updates
We knew a total bathroom remodel involving new cabinetry or a new tub/shower would be out of the question, and quite frankly – unnecessary at our stage in life. But we did make three inexpensive updates that can totally change the look of a room:
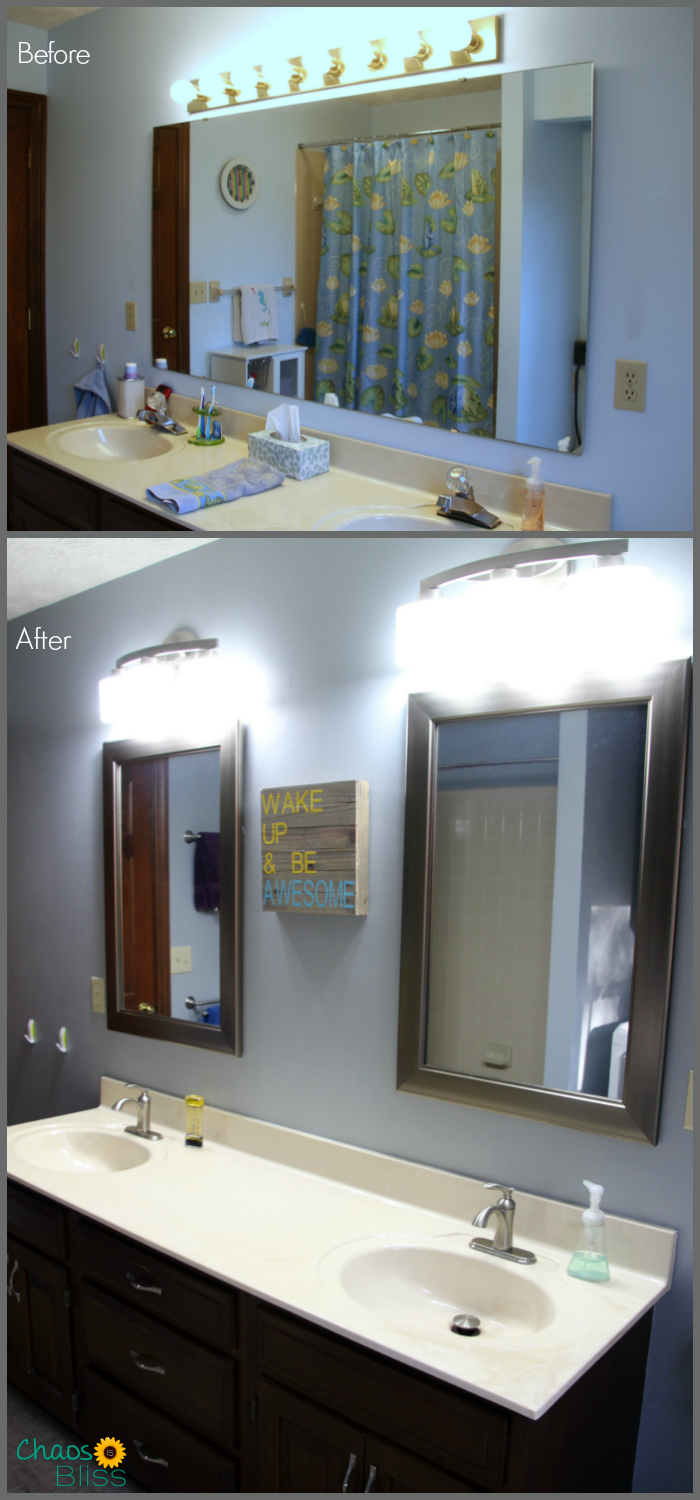
- Paint color. Changing the paint color is easy, and so cheap! It might be hard to differentiate in these before and after photos, but we went from a very sky blue to a slate blue/gray color.
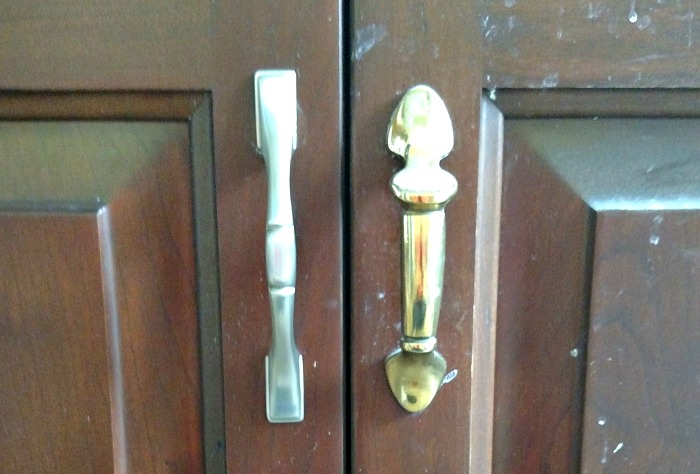
- Door handles and drawer pulls. This was so simple I did it myself! I chose a satin nickel finish to update the 1989 brass hardware on our cabinet doors and drawers.
- Flooring. With the small square footage a bathroom has, it’s a great space to update flooring relatively inexpensively, and add so much to the look and value of your home! Our bathroom had an outdated vinyl floor previously, which we updated to Coretec Plus luxury vinyl tile, for its durability, sustainability and it was virtually waterproof (although of course we had a washing machine floor pan which is absolutely necessary for an upstairs laundry). We LOVE our new flooring – it looks like wood planks, but it snapped together as a floating floor and was super easy for our contractor to install.
We also changed out our toilet to a new fancy one with dual flush to save on water, and we updated to new faucets.
Finally, the last piece that we decided to update at the last minute with our bathroom remodel is the mirror and lights – you know, the huge brass light fixture circa 1980, with the eyeball globe light bulbs? I chose to replace the humongo mirror over the vanity with two framed mirrors, and added new light fixtures above each mirror.
I’m so very pleased with how our bathroom remodel turned out! While it wasn’t in our budget to totally gut and renovate the entire space, I think these updates really help to make the space more appealing. And I can’t tell you how much I’m in love again with the return of an upstairs laundry!
Be sure to check out the laundry hack I mentioned earlier that saves me time and wrinkles (well, clothing wrinkles not facial!):


 I love sharing ways to spend less, so families can do more! My passions are cooking, late night TV and being amused by my witty husband and three kids.
This is great! We’re moving soon and have a big list of projects, one of them being getting rid of those same light fixtures in the master bath! We also want to remove the door to the entry closet and make it a little mudroom. I think I might need the name of your contractor. 🙂
Yes!! What were they thinking with those eyeball light bulbs. I don’t like how much heat they put off, either.
Love the simple and functional makeover. Did you also resurface the cabinets?
My hubs has mentioned wanting to move our laundry to the bathroom space, but like you cringe with mud room dust bunnies I think about the yuckiness that a house of all boys has and what they leave behind in the bathroom. My kids are about the same age as yours also. What do you think? Is there a worry about that? Or does the convenience out way the cringe?
We also have a bathroom/laundry room and I love it!
It has been set up so you really don’t worry about the “bathroom yucks”. My kids all help with the laundry and I try to make it fun. Magnets on the washer (yes sometimes they get a bath) dry erase faces that I also sometimes use to write mommy messages to the kids. We are in the room so often with 6 kids you need to make the chore NOT such a chore.
I really appreciate your work especially the research part of it which made the whole point very easy to understand. Please keep writing thi type of post.
Been folding directly from dryer to basket for years. Except for sheets which are way too large for me to do that. So much easier and faster than working from a wrinkled wad of tangled stuff in the basket. Glad you are enjoying your new found freedom. Well, not so new anymore.